Plant Inventory

herb garden

Herb Garden

We’ve just completed a fall inventory of edible, medicinal and insectory plants at LongGreenHouse done in the last week of September 2011. In fall 2008, this .42 acre site was mostly lawn with two apple trees, a silver maple, highbush blueberry and some ornamentals.

Under the guidance of Charles and Julia Yelton (Permaculture Instructors), UMaine professors Joline Blais (New Media), gkisedtanamoogk (Native American Studies), Cheryl Robertson (Education), Emily Markides (Peace Studies), and Miigam’agan (Mi’kmaq Clan Mother), and Debby Bell-Smith (Director of the Wassookeag School), and with grad students William Giordano, and Julian Epps, as well as a small crew of Still Water journeypersonsthe site is currently a lush edible landscape full of perennials, herbs, fruit and nut trees, berries and medicines.

A whole community of multiage learners from inside and outside the university gathered to generate this abundance in the soil and the ecosystem from UMaine classes, to Permaculture workshops, to the Wassookeag Schoolchildren.

The project also partnered with ESTIA, and Anikwom WholeLife Center and received a small MWRRI grant from the Mitchell Center in 2010 for the design work that lead to the pattern of plantings.

LongGreenHouse is a project of Still Water.

See gallery of plants in this inventory.

Social Media & Sustainability

LongGreenHouse Design

LongGreenHouse Design

5-7pm at 5 Chapel Road (garden tour & discussion)
7-9pm at 42 Mill Street (potluck, music, fun!)

Joline Blais, Claudia Lowd, gkisedtanamoogk, and Craig Dietrich lead local growers and media activists in a discussion about how social networks can support edible backyards and local farmers. Projects presented include LongGreenHouse, a living/learning center based on the Wabanaki Longhouse model and permaculture design principles, including a multi-age school, a UMaine journeyperson program, and Native elders all under one roof. Also featured will be LA Green Grounds, a grass-roots gardening initiative in Los Angeles that has become a YouTube phenomenon. The event begins with a tour of permaculture gardens at the south edge of campus at 5 Chapel Rd., followed by a potluck at an urban garden site at 42 Mill St. in downtown Orono. For more information contact Joline Blais on First Class. Sponsored by Still Water.

My father recently started making his own jelly. His most recent batch, (hand-picked) strawberry jelly was the best yet. However, I did wonder how I would be able to recreate his jelly without the need to buy liquid apple pectin. Of course, Grandfather Internet gave me the answer:

(from http://www.wildflowers-and-weeds.com/The_Forager/pectin.htm)


Making Your Own Apple Pectin
By Sam Thayer
From The Forager. Volume 1, Issue 3. August-September 2001

When making homemade jams and jellies, commercial powdered pectin is usually the most expensive ingredient. A few generations ago, powdered pectin wasn’t readily available, and the skill of making pectin at home was common knowledge for the family cook – yet today it is a rare individual who knows how to do this. I learned how to extract pectin from apples a few years ago when I made jams and jellies for a living (as many as 600 jars per day). Not only does this save money, but more importantly, it provides the satisfaction that only comes with doing things from scratch – one of the reasons that I love using wild foods.

To prepare liquid apple pectin, it is best to use under-ripe apples that are still a bit green, hard, and sour. Ripe apples contain less pectin, but the level varies greatly from one tree to the next; some varieties are suitable when ripe, while some have virtually no pectin by that time. Over-ripe apples are the worst. You can use your damaged or misshapen apples for making pectin. Chop them in halves or quarters, fill a large pot, and then add just enough water to almost cover the apple chunks. Cover the pot and place it on low heat for a long time, until the apples are fully cooked and you have something that looks like runny applesauce with skins and seeds in it. Stir the apples every twenty minutes or so while they are cooking.

I arrange a strainer for this “sauce” by placing a cheese cloth (actually a white T-shirt) over the top of a five-gallon pail, secured by a cord tied around the rim. (A piece of cheese cloth in a colander works fine for smaller amounts.) The hot applesauce is then poured into the strainer; what drips out the bottom should be a clear, thick liquid that’s a little bit slimy to the touch. That’s your liquid apple pectin. I usually let mine strain overnight, because it drips slowly. You can get more pectin by pressing it, but then it comes out a little cloudy and carries more of the under-ripe apple flavor. I like to make a few gallons of this pectin at a time and then save it by canning or freezing – it’s not hard to get a year’s supply with one batch.

To test the strength of the pectin, pour a little bit of rubbing alcohol into a glass and then drop in a spoonful of pectin. The pectin will coagulate into a jelly-like mass. If this mass can be pulled out with a fork and it forms a heaping gob on the tines, it is concentrated enough to jell perfectly. If it can be picked up by the fork, but mostly hangs from it, then it will jell loosely. If it cannot be picked up by the fork in mostly one mass, then the concentration is too weak for it to jell. In this latter case, you just have to boil it down to increase the concentration of the pectin. (Note: the alcohol test doesn’t work right if the pectin is hot.)

You can mix liquid apple pectin with fruit or juice and boil it down until the mixture has enough pectin to jell. This can be a little tricky. If you mix it with a fruit juice such as chokecherry that has little or no natural pectin in it, you will want to boil this mixture down to approximately the same volume as that of the pectin that you put in. If you mix it with high-pectin fruit such as wild grapes, you might only have to boil it down a little. Boiling the fruit-pectin mixture will not harm the flavor unless it cooks to the bottom of the pan, which will not happen if you keep stirring it as it boils. (An overcooked or burnt flavor is generally the result of cooking the jam for too long only after the sugar has been added.) I like to use liquid pectin instead of water to cover fruits such as currants or wild cherries when I boil them to extract the juice. After boiling down a little bit, such juice often has enough pectin to jell. If it is cooled down, the pectin concentration of the juice can be determined using the alcohol test described above. One great thing about apple pectin is that it can be used to dilute or balance the flavors of certain fruits that are not tart enough to make superb jam by themselves, such as elderberry and chokecherry.

When using homemade pectin, you can’t just follow the proportions found on the chart in a Sure-Jell packet; you have to understand something about what makes jelly jell. Basically, there are two factors involved in this: the concentration of sugar and the concentration of pectin. Too little of either one, and you end up with syrup. It is possible to compensate for a little less sugar with more pectin, or vice-versa – but you can only stray from the recommended ratios a little bit. The most common reason that people have batches that do not jell is because they want to add less sugar than the recipe calls for. If you are going to make jam or jelly, you may as well accept right now that these confections are mostly sugar; that way, hopefully, you will avoid this temptation.

When you reckon that your fruit-pectin mixture is about right, mix in sugar at a ratio of about 5 cups of fruit-pectin (or juice) to 7 cups of sugar. Stir constantly – especially with jam – to keep it from burning to the bottom of the pan. After the jelly comes to a full, rolling boil, let it do so for about a minute. Then, if everything has been done right, it should be ready to pour into jars. If you are not confident, however, this is the stage for the final jelly test. Turn the heat down low when the boiling begins. Dip a large spoon into the mixture and then hold it over the pot sideways. If the last jelly falls off the spoon in a sheet rather than a drop, or if you get a drop that hangs down bulging at the bottom and doesn’t fall (this happens especially with wooden spoons), then you’re in business. If the jelly passes this test in either way, bring it briefly to a vigorous boil on high heat. Here you will find yet another indicator of whether it will jell or not. It will not just boil; it will boil up, get foamy, and probably make you scared that it will boil over. (If you don’t turn the heat off soon enough, it will boil over.) This is when you pour the jam into clean mason jars and cover with clean lids. Turn the jars upside-down for a minute or two to sterilize the lids, right the jars, and try to ignore them for a few hours while they set. (Note that home canning of jam and jelly is not dangerous, and you do not need to sterilize the jars in a boiling-water bath or use a pressure canner!)

Hopefully this doesn’t make the whole process seem harder than it is. Like many skills, once you learn how, it’s a piece of cake. It may be encouraging to know that I never use the alcohol test anymore, and rarely even rely on the last jelly test. After making a number of batches, you can tell just by looking at the jelly if it’s going to jell.

Is it worth all this trouble just to make your jam from scratch? Trouble? There’s no trouble when I do it – just a lot of fun. And that’s what it’s all about.

Summer Hours

Summer Permaculture Days are upon us.

Friday 11-3

Stop by to see the kiwi vine climbing up the deck, the lilac in full fragrance, the Poppy emerging, the purple  asparagus towering up, the bluberries setting fruit,  the apple trees in flower, and the humans rolling a manual lawn mower, or thinning the kale and spinach.

Bring work gloves and a water bottle if you want to get your hands in the dirt–so many worms, mushrooms–the soil life is exploding!

April Garden Field Days!

Friday, April 15  12-4pm

Friday, April 22  12-4pm

Wed,  April 27 12-4pm

It’s Spring and LongGreenHouse and the SWPG are gearing up for an exciting season. Our young fruit and nut tree nursery made it through the winter, and the buds are just starting to shown signs of breaking dormancy.  We’ve been working this winter on refining permaculture designs and developing them for presentation and we’ll be presenting them in and out of the garden all season. Get a sneak peak viewing below!!! And check out the Events page for April Garden Field Days

This year more than ever we are gearing up to present the past three years of work and research. Graduate students have been developing a low-cost suburban edible landscape as a prototype for large-scale public gardens and “village scale” urban food production as a collaboration between with the University of Maine’s Intermedia MFA Program, the Town of Orono and Still Water, A research arm of University of Maine New Media. The work is intended to become repeatable community resource here in the greater Bangor region and throughout the state. If you’re interested in our work, or hosting a gathering in your community, please let us know. Send a e-mail to william.giordano@umit.maine.edu, or just show up if you would like to join us.

View our latest design work below.
See you in the garden!

Natural Swimming Pools-How To


193-064-01m

Though fairly common in Europe, natural swimming pools (like the one pictured above in an Austrian family’s backyard), are in their infancy in the United States. Ask most American swimming-pool contractors to build a backyard pool and chances are they’ll roll out a long list of goods, including rebar, gunite, fiberglass, chlorine and an energy-sapping filtration system. But in recent years, a few builders and a growing number of homeowners have learned how to build pools without relying on a mass of manufactured materials and chemical additives. They’ve found it’s possible to construct pools that are more about building with nature and blending into the natural landscape. Natural swimming pools use gravel stone and clay in place of concrete or fiberglass, and aquatic plants instead of harmful chemicals and complicated mechanical filtering systems. The plants enrich the pool with oxygen, support beneficial bacteria that consume debris and potentially harmful organisms, and give habitat to frogs, dragonflies and other water life. The result is a beautiful, ecologically diverse system that is relatively inexpensive to construct. (A natural pool can he constructed for as little as $2,000 if you do it yourself, while conventional pools can cost tens of thousands of dollars.) Natural swimming pools require no harmful chemIcals, are fairly low-tech, and once established call for only a modicum of management. You won’t have to drain the pool each autumn. Except for topping it off now and then, you’ll fill the pool only once.

DIG IT

The cheapest and most ecologically sound way to build a swimming pool is simply to hollow a hole in the ground. You can make your pool as shallow or as deep as you want, but the key is to make sure the sides slope: Otherwise the soil will cave in. The ratio should be a 1-foot vertical drop for every 3 horizontal feet. “It’s not a bathtub effect, but more like a soup bowl,” says Tom Zingaro, partner with Denver-based Blue Lotus Designs, a pool-and pond-architecture company. One of the main reasons traditional swimming pools are constructed with a steel framework is to ensure the walls stay vertical and perpendicular to the bottom surface of the pool. Construct a pool with sloping sides and you’ll eliminate the need for any steel reinforcement.

ZONING

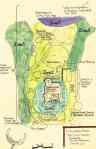
Reserving at least 50 percent of your pool’s surface area for shallow plants, either at one end or in a ring around the sides, eliminates the need for chlorine and expensive filters and pumps. You’ll want to separate the swimming area of your pool and the filtration area, or plant zone (see the illustration). A rim within an inch of the water’s surface keeps plants in their place but allows water from the swimming area to move to the plant zone for filtering, As water passes through the fibrous root structure of the plants, bacteria concentrated on the plants’ roots act as a biological filter, removing contaminants and excess nutrients in the water. Decomposer organisms, also found in the plants’ root zones, consume the bacteria, effectively eliminating underwater wasteInside the plant zone, the water should get steadily deeper, reaching a maximum depth of 18 inches near the swimming zone. The outermost 6 inches of the plant zone will be 2 to 3 inches deep, providing a home for taller aquatic plants. Submergent and floating vegetation occupy the deeper area.

Besides cleaning the water and making your pool beautiful to behold, the shallow plant zone warms the water quickly and provides habitat for frogs and many invertebrates. They’ll appreciate the shallow water for breeding grounds and repay the favor by eating mosquito larvae.

NATURAL FILTRATION

The water needs to circulate continuously for the plants’ roots to cleanse the pool. You also may need to aerate the water so the water organisms’ oxygen needs are met. (Without adequate oxygen, your pool could become stagnant, harboring odoriferous anaerobic bacteria.)

Water can be channeled from your pump into your plant zone through the use of PVC tubes. (Zingaro recommends using flexible PVC in cold climates.) In any climate, bury the tubing in the soil about 18 inches deep. Underwater aeration, which uses less energy than constructed waterfalls and circulates water more effectively, involves diffusing air at the pool’s bottom. You can build your own aerator, using an air compressor (1/4-horsepower for a pool smaller than an acre) and high-strength tubing that connects to a diffuser. The diffuser (see “Equipment Sources”), which bubbles air through the water, rests in the deepest part of the pool, where swimmers are not likely to damage it. Connect a brass manifold to the compressor to regulate the air pumped into the pool. Don Schooner at Inspired By Nature, an Ohio-based, pond-and-lake-restoration company, suggests aerating the pool four to eight hours a day: in the morning, when oxygen demand is greatest, and again in the evening. Place your aerator, pump and skimmer in a plastic container, such as a bucket or large plant container, and put a steel-mesh filter mat over the top, to keep debris out of your equipment. Expect to pay $1,000 to $1,200 for a quality underwater aeration system.

Some folks use skimmers hooked up to an additional small pump, to suck off floating undesirables. While these devices are not essential, you might want to consider purchasing one if leaves or seeds from nearby trees and shrubs are likely to litter your pool. The skimmer removes detritus that would otherwise sink and contribute to algae growth.

Installing pumps and compressors can be a tricky business because you’re running electrical devices near or in water, You’ll want to connect electrical hardware to your home power supply through a buried conduit. Do not run your power through an extension cord. Hire a skilled electrician who will ensure the safety of the system.

Once you’ve dug the hole for the swimming pool and the plant zone, you have a couple of options, depending on your soil conditions, to make sure the pool holds water: You can apply a layer of bentonite clay to seal the soil or lay a synthetic liner. Bentonite is usually the cheaper option, averaging 35 cents per square foot. Liners can cost 25 cents to $1 per square foot, depending on their composition and weight.

Bentonite works as a glue, bonding with the soil particles and preventing pool water from seeping into the ground. Some soils may contain enough clay that simply compacting the pond bottom will enable it to hold water. Talk to local pond builders to find out for sure. But beware: Bentonite doesn’t bond well with sandy soil. Particularly sandy soil can require up to 12 pounds of bentonite per square foot, as opposed to 6 pounds in clay-rich soil. Bentonite also can be troublesome when the surrounding soil is very dry. In arid climates, Zingaro recommends bentonite be applied beneath a plastic liner that is woven or textured on the bottom. This liner keeps the bentonite from shifting. In more humid climates, bentonite can be applied directly to the soil. Before treating your pool with bentonite or any other clay powder, thoroughly compact the soil. You can do this with a lawn roller or a plate compactor. Then, while wearing a mask, spread a 2- to 3-inch layer of bentonite powder along the pool sides and bottom. Pack it down with a tractor or plate compactor. Then apply another foot of quality topsoil and compact again.

If you choose a liner, select one made of ethylene propylene diene monomer rather than PVC. EPDM is a synthetic rubber twice as expensive as PVC, but it’s worth the extra cost. It has protection from ultraviolet rays, and unlike PVC remains flexible in cold weather. If your soil has a lot of rocks or roots, select a 45- or 60-millimeter liner. You can use a 30-millimeter liner if your soil is very sandy and smooth, and if you and your guests aren’t likely to tear holes in a liner while frolicking in the pool. Before laying your liner, compact the sod and cover it with a layer of sand or an absorbent material such as old carpeting or newspaper. Newspaper is a good option: When wet, it bonds to the liner, providing extra protection if the liner develops a small hole.

After the bentonite clay or a liner is installed, cover the bottom of the pool with 4 to 5 inches of gravel. The gravel provides a habitat for beneficial bacteria, which help biodegrade leaves or other natural materials that sink to the bottom of your pool. Make sure you use clean gravel. Fill a 5-gallon bucket with a spigot with some of the gravel you intend to use. Open the spigot and run water through the gravel. If the water comes out dirty, you need to clean the gravel (a taxing, water-wasteful process) or find another source. Expanded shell aggregates and other manufactured gravels are likely to be clean enough to use in your natural pool. In addition to lining the pool with gravel, many people opt to build cobblestone steps for access into and out of the pool. A cantilevered dock built out over the water also provides an easy way to get in and out of the pool, and helps protect the pool’s sides.To finish the edges of your pool, run a plate compactor around the perimeter. This will help with soil erosion, but it’s not enough to guarantee dirt won’t fall into your pool. One option is to edge the perimeter with rocks, flagstone or wood planking. Better still, plant right next to the edge and let the plants stabilize the perimeter, says Martin Mosko, principal architect with Marpa and Associates, a Boulder, Colorado-based landscaping company. Plants work not only to anchor the soil, but create a natural setting for an old-fashioned, swimining-hole effect. Mosko says if you use plants instead of stone, choose plants that thrive in wet soil or make sure the water level is at least a foot below the pool’s edge so the perimeter plants don’t become waterlogged.

CONCRETE OPTIONS

If you prefer a more conventional pool shape, consider construction with cement or Rastra block, a material manufactured from cement and recycled foam plastic. Less ecofriendly than gravel and stone, these systems still can reduce chemical and energy usage by using plant-based filtration systems rather than mechanical filters and chlorine to clarify the pool water.

Pouring a concrete pool can be tricky. You have to have the right mix and the right density to prevent cracking. Because of the intricacies involved in concrete pouring, Zingaro advises against do-it-yourself concrete pool construction. If you’re experienced in concrete work, he offers the following tips: Use an 4-1 ratio mix of portland cement and sand, and cover the compacted soil with fiber mesh, a rubber liner, old carpeting or newspaper, to provide a stable surface for the concrete to adhere. After the concrete is poured, trowel on a %inch coat of stucco to waterproof the pool, since concrete is porous.

An alternative to concrete is Rastra block. These blocks are 10 feet long, 15 or 30 inches high, and 10 or 14 inches thick. Made of recycled polystyrene and cement, they weigh a fraction of concrete: Two people easily can set 10-foot sections into place. Kenton Knowles of Global Homes in Baldwin City, Kansas, built a 16×32-foot pool out of Rastra for about $1,600 in materials.

To build a Rastra-block pool, excavate a hole just larger than the pool’s dimensions to allow for ample workspace. Most people choose to construct a pool 5 feet deep. For the bottom, either pour a concrete slab or cover the bottom with a rubber liner. Then line the bottom with gravel. Make sure to install a drain and backflow preventer. Lay one section of Rastra block along the edges of the slab, securing the Rastra to the pad with rebar. Fill the Rastra blocks’ cavities with concrete. As the concrete flows from block to block, the structure is tied together. An expanding foam sealant is used between courses and at all joints to hold the blocks in place. Knowles recommends waterproofing the blocks by troweling on two coats of stucco. Backfill the space between the sides of the pool and the Rastra block with soil. You can finish the perimeter with stones laid from the top of the blocks out into the surrounding area, or you can grow plants to the edge of the blocks.

Once your pool is constructed, you’ll need to prepare the plant zone with 3 to 6 inches of soil. Choose your soil with care as soil can carry various contaminants. Avoid harvesting soil from areas where animal excrement is prevalent, such as in dog runs or from grazing areas. Select soil that’s free of organic matter, which would rot underwater. You can have a lab test soil samples for potentially pathogenic bacteria. To find a laboratory in your area, contact your state’s health department. once soil, gravel and hardware are in place, you can fill the pool. Disturb the soil as little as possible and let the pool rest for a week before installing plants. During this time, you can test your hardware to make sure it works.

SELECTING PLANTS

Be sure to choose plants suited to your climate. Your best bet is to obtain your plants from a native-plant supplier. Check the phone book and Internet for local sources. Home and garden centers also carry more aquatic plants now that backyard ponds are growing in popularity. End-of-the-season sales can save you money. Several mail-order nurseries also specialize in water-garden plants. (See “Pool Construction and Design.”)

Sedges (Carex) and rushes (Scirpus), both aquatic plants, make great emergent vegetation for your pool’s perimeter. You can also consider lesser cattails (Typha angustifolia) and aquatic irises, though be sure to ask which varieties won’t overcrowd other plants. Pickerel weed (Pontederia cordata), arrowhead (Sagittaria) and water primroses (Ludwigia) are all contenders for the shallowest areas of your pool. Be sure to include submergent plants such as common waterweed (Elodea) and hornwort (Ceratophyllum) for their high oxygen output.

In water 6 to 18 inches deep, plant a mix of floating, submergent and emergent plants. Water lilies (Nymphaea) adapt to any depth, so use them liberally. Floaters, such as pondweeds (Potamogeton) and common duckweed (Lemna minor), drift freely on the surface and quickly cover the surface of the plant zone.

Before you make plans to tromp off to the nearest country pond and gather up a truckload of greenery, wait! Before collecting a single plant from the wild, know the laws protecting wetlands and their plants. if you do collect, be careful to guarantee the health of the wetlancl by selecting only a few samples from larger populations. Consider rescuing plants from a threatened site. Perhaps a new corporate headquarter’s construction is going to destroy your favorite frog hollow. Contact the company to see if it will allow you to rescue the imperiled plants and maybe a few amphibians.

Once you’ve purchased your plants, you can plant them in the filled pool. Stick to a plan, grouping plants according to height and type. Place your plants into the soil, anchoring them, with plenty of gravel.

ALGAE CONTROL

Pond owners have been battling algae the mighty green menace —for eons. Algae compete with plants for nutrients and light, but spring algae blooms often decline as soon as water lilies and other plants emerge to shade the water. Promote plant growth and deter algae by adding plants and eliminating phosphorous to maintain a lower pH (5.5 to 6.5). The easiest remedy, and the least risky to your aquatic ecosystem, is to add more plants, which will outcompete the algae for nutrients. A second option is to monitor the pool for phosphorus. Fertilizers and urine are the two major sources of this nutrient, so make sure your pool is free of nutrient-rich runoff and remind everyone to use the bathroom before swimming. You can also increase your aeration schedule to stimulate more biological activity.

If algae problems persist, adding small amounts of straw to the pool will help. For full details, visit the Institute of Arable Crops Research Web site at http://www.iacr.bbsrc.ac.uk/pie . Go to the Center for Aquatic Plant

Management link and download “Control of Algae Using Straw.” For barley straw sources, go to http://www.ianr.unl.edu/pubs/wildlife/nf429.htm or http://www.naturalsolutionsetc.com.

Enzymes, bacteria, acids and other strange brews have been offered as magic bullets for obstinate algae. Introducing additives to your pool may be an interesting scientific experiment, but it won’t necessarily improve the pool you’ve invested plenty of time and money in. Beware of salesmen hawking their grand variety of miracle algae cure—alls. Remember: Your pool is a dynamic, living ecosystem. Adding synthetic chemicals probably will not bring it back into balance.

Pool Protection

Do you need to be concerned about cultivating potential pathogens in your pool? While it’s true aquatic plants do not remove all contaminants from the water— and pools constructed of dirt, concrete or rubber liners don’t necessarily keep bacteria at bay — the probability for contracting a serious disease from your natural swimming pool is low. Dr. Michael Beach of the Centers for Disease Control and Prevention says even chlorine-treated swimming pools can fall prey to fecal coliform contamination, which is responsible for problems such as cryptosporidiosis, a parasite that can cause diarrhea and stomach cramps. Keep babies and pets out of the waters to avoid contaminating your pool with fecal coliform. If you’re uncertain about your natural pool’s water quality, have it tested.

MAINTENANCE

Removing plant litter in spring and fall will help maintain the long life of your natural pool. Keep your water level constant, and be prepared to add water as needed. inexpensive test kits, available in garden centers, will allow you to monitor your pool’s nutrient levels, alerting you to problems.In addition to maintaining the pool’s biological health, check the mechanical systems annually. Wipe diffusers with vinegar to remove deposits, check air hoses for cracks and obstructions, and examine all connections to the pumps. Given these precautions, your pool should provide you cool pleasure for years to come.

Equipment Sources

Aeration

Inspired by Nature

Water Testing

Hach Company
Filters4H2O

Pool Construction and Design

Biotop (Austria)
Blue Lotus Design
Global Homes Design
Water Gardening Magazine

Time for Spring Action!

Rain Garden

Got Rain? Start a Rain Garden!

It is beginning to look “springy” around here(finally!!) and it’s around this time that we all feel the burning desire for home improvement! It’s as natural an instinct as spring cleaning, probably driven by having spent SO much time in ours homes during the last 6 months. This has made us extra aware of the dust in every corner, and the sqeaking of every door hinges! So here’s 15 GREEN projects to make our homes better, EACH $500 OR LESS!

Continue reading

Make Your Own Hygiene Products

While Many people are aware of the chemicals in their food, few are aware of the strange ingredients in their products, especially ones used often, like soap, deodorant, and toothpaste. Here are some ‘recipes’ for DIY hygiene products that I found:

Homemade Toothpaste

Have you ever noticed how many chemicals are in your toothpaste? Before big toothpaste manufacturing existed, people used baking soda and salt to cleanse their teeth or even just pure water. Today there are many chemicals added to enhance taste and to make your mouth feel “fresh” and minty, or to make them whiter (allegedly…)! Fluoride compounds are often added because they are supposed to be good for your teeth—but are they really? According to recent studies, the fluoride compounds may be doing your teeth more harm than good. Additionally glycerin based toothpaste coats your teeth preventing your teeth from remineralizing which is bad for your teeth and causes decay. This guide provides you with all you need to make your oral hygiene healthier for you and the environment!

BENEFITS FOR THE ENVIRONMENT: Less packaging and production of synthetic chemicals. By making your own toothpaste/tooth powder you are saving the energy it would have cost to manufacture commercial toothpaste and to ship it to local stores. It is also a lot more natural and healthy for your teeth!

BENEFITS FOR YOUR HEALTH: As already mentioned, the chemicals added to commercial toothpaste may not in fact be good for your teeth. An acquaintance of mine recently informed me that she switched away from commercial toothpaste and has instead been brushing her teeth with natural soaps. She told me that although the taste is not great, her teeth feel much cleaner. This may not sound true but it makes a lot of sense when you think about it. Natural soap without the added synthetic chemicals ARE gentle and they clean your teeth. If you are daring you can try out some of the recipes listed in this guide!

Costs: Low

Time and Effort: Low

Make your own Tooth Powder
Ingredients:

  • – ¼ cup baking soda
  • – 1 tsp salt – Optional: flavor of your choice, for example peppermint or coconut oil

Directions:

  1. Mix the baking soda, salt, and flavor (optional) together in a small container.
  2. To use your tooth powder, simply wet your toothbrush under running water then dab it into the powder and brush your teeth!

    * If you do not add any flavor the taste may take some getting used to *

Make your own Traditional-type Toothpaste: If you are not ready to use powder to brush your teeth, try making this nice toothpaste! It creates foam much like the toothpaste you would purchase in a store.

Ingredients:

  • – ¼ cup baking soda
  • – ½ tsp water
  • – ¼ tsp Dr. Bronner’s liquid soap—either one of their scented soaps or the unscented soap if you prefer to go au-natural or want to add your own flavor!

Directions:

  1. Combine all of the ingredients in a small container and mix them up to form a paste.
  2. To use, just put about a pea size dollop on your toothbrush and brush as usual.
  3. The paste will thicken over time, so add more drops of water to your mixture every once in a while to make it easier to use.
  4. Middle of the Road: If the taste is an issue for you, try mixing this paste with your preferred commercially produced toothpaste and slowly wean yourself off of that paste. Or you can continue to use the mix and still reduce production energy costs and transportation costs!

MOUTHWASH

Mint Mouthwash Ingredients:

  • – 1 cup water
  • – ¼ carbonated water
  • – 1 tsp aloe vera gel
  • – 10 drops of peppermint or spearmint oil

Directions:

  1. Boil the water and add the carbonated water and aloe vera gel.
  2. Cool the mixture and add the peppermint or spearmint oil. Shake well.
  3. Store in an air tight bottle.

Lemon Mouthwash Ingredients:

  • – 1 cup water
  • – ½ cup carbonated water
  • – 1 tsp aloe vera gel
  • – 10 drops lemon essential oil

Directions:

  1. Mix all of the ingredients in a bottle and shake well.
  2. Store in an air tight bottle.

Tea Tree Oil Mouthwash Ingredients:

  • – 1 cup warm water
  • – ½ tsp Myrrh tincture
  • – 5-8 drops tea tree oil
  • – 5-8 drops mint oil

Directions:

  1. Mix all the ingredients in a container.
  2. Use as you would` conventionally bought mouth wash.


Natural Deodorants

Have you heard that antiperspirant deodorant is bad for you? This is certainly news to me! The bad components in antiperspirants are the aluminum compounds. There have been links to Alzheimer’s Disease and cancer from these aluminum compounds, which get into your body through the pores in your armpits. So what should we do about it? The best thing to do is to stop using all types of deodorants but in today’s society that is unacceptable. Some alternatives are to use lemon juice, baking soda, make your own natural deodorant, or buy natural deodorant that is aluminum-free. By using natural or homemade deodorants you are keeping your own body healthy and our planet healthy too! Here is a guide to making your own natural deodorant bar based on a ‘Girl on bikes’ recipe!

BENEFITS FOR THE ENVIRONMENT: Less synthetic chemicals being produced in our system and deodorant packaging!

BENEFITS FOR YOUR HEALTH: Less aluminum going into your body, reducing your risks of developing diseases down the road.

COST: Low

TIME AND EFFORT: Minimal

Deodorant Bar Recipe:

Ingredients:

  • – 1/4 cup baking soda
  • – 1/3 cup cornstarch
  • – 10 drops or 1/2 tsp tea tree oil
  • – 1 tbsp coconut oil
  • – Optional: ¼ tsp of your favorite scented oil added in

Making Deodorant

Instructions:

  1. Mix together in a bowl the baking soda, cornstarch, tea tree oil, and any optional scented oil you choose.
  2. Once your mixture has an even consistency, add in the coconut oil.
  3. Try adding food coloring to the mix for a fun color!
  4. Shape your mixture into a disk shape or any shape you like. Then either place your deodorant bar into the oven at 145 degrees for 15 minutes or you can microwave it for 2 minutes. Alternatively, you can use an empty deodorant container to put your mixture into and then heat that in the microwave.
  5. Once the bar cools it should be firm and ready to use!

Deodorant Bar

Here are some additional ways to make deodorant!

Deodorant Powder:

Ingredients:

  • – 1/2 cup baking soda
  • – 1/2 cup cornstarch
  • – Optional: a few drops of your favorite scented oil, such as lavender or cinnamon.

Instructions:

  1. Place the ingredients in a glass jar and shake it to mix the ingredients.
  2. Sprinkle a light covering of the powder on a damp washcloth. Then pat the washcloth onto your underarm area.

Liquid Deodorant:

Ingredients:

  • – 1/4 cup each of: witch hazel extract; aloe vera gel; and mineral water
  • – 1 teaspoon vegetable glycerin
  • – Optional: a few drops of antibacterial tea tree oil or scented oil of your choosing such as lavender or cinnamon

Instructions: Combine the ingredients in a spray bottle, then shake the bottle well and spray onto your underarm area.

Alternatively, you can buy natural deodorant at a store instead of making it yourself.
Here are some recommended brands to try:

  1. Tom’s of Maine( http://www.tomsofmaine.com/products )
  2. Herbal Clear(  http://www.herbalclearnaturally.com/home.asp )
  3. Burt’s Bees Herbal Deodorant( http://www.burtsbees.com/natural-products/outdoor-protection/herbal-deodorant.html )

Homemade Soap Recipes

Why bother going through the trouble of making your own soap when you can easily buy soap in the store you ask? Making your own eco-friendly soap is worth it! This guide includes recipes for eco-friendly soap bars and liquid hand soap, as well as a rundown on all the benefits of making your own soap!

BENEFITS FOR THE ENVIRONMENT: Despite all of the safety claims regarding industrial soap, no one really knows what effect the myriad of chemicals will have on the environment. One study by the John Hopkins Bloomberg School of Public Health found that about 75% of the main chemicals in antibacterial soap are passed through wastewater filtering to be later used to fertilize crops. Moreover, some regular shower gels contain ingredients that take 200 to 300 years to biodegrade! For more information on the environmental impacts of soap, check out: Soap and the environment. The good news is that if you make your own soap and choose all natural ingredients with the help of this guide, you can make 100% biodegradable soap!

BENEFITS FOR YOUR HEALTH: Many mass-produced soaps contain a large quantity of synthetic ingredients that could have unhealthy side effects. For example, many synthetic fragrances are suspected to contribute to birth defects, liver damage, and cancer. When making your own soap, you can choose any natural fragrance you like for its aromatherapeutic effects without worrying about the harm of synthetic fragrances. Also, for those of you who are allergic to the harsh chemicals in soap, or for those of you who just have sensitive skin, homemade soap is much more mild on your skin, has naturally moisturizing ingredients, and can be fragrance-free.

BENEFITS FOR ANIMALS: Since you make the soap yourself, you can be sure that you won’t be supporting any animal testing. For more on animal testing: http://www.greeniacs.com/GreeniacsArticles/Animals-and-Testing.html. It is also good to be aware that you don’t necessarily need to use any animal-based materials (like the commonly used tallow mass, which contains beef fat). You can also be certain that potentially hazardous chemicals will not be rinsed into our waterways. An anti-bacterial chemical, Triclosan, commonly used in soaps, is registered with the Environmental Protection Agency as being a pesticide and is believed to destroy fragile aquatic ecosystems. Eco-friendly soaps can benefit every ecosystem!

Cost: Moderately Low
Compared to actual soap, homemade soaps can be quite cost-effective since you can buy many of the materials in bulk.

Time and effort: Moderately High
The process of soap making outlined in this guide is called the “cold process,” which is relatively quick compared to other processes that start from scratch. Cold process soaps require only about an hour or so to take, but about 48 hours to harden and 3-4 weeks to cure. In fact, the longer they are left alone, the better the product. For more soap recipes and ideas, click here.

Suitable for Vegetarians and Vegans! This particular recipe is for a coffee scented soap, which is suitable for vegetarians and vegans because it uses all vegetable oils rather than tallow. This is just one of the scents (or scent combinations) you can choose—feel free to experiment with different fragrances! However, before creating your own mixtures, be sure to calculate the exact concentrations of ingredients needed. Too much lye can make your soap overly abrasive, while too little lye can make your soap very oily. This can be done by using one of the many lye calculators easily found online.

INGREDIENTS:
• 8 ounces (227 grams) soybean oil
• 4 ounces (113 grams) coconut oil
• 4 ounces (113 grams) olive oil
• 5 ounces (142 grams) coffee (to be used instead of water)
• 2 ounces (57 grams) lye

Most of the above vegetable oils can be found in regular grocery stores, and there are a variety of websites that sell lye online: http://candleandsoap.about.com/od/coldprocesssoapmaking/a/lyesources.htm.

ADDITIONAL MATERIALS NEEDED:
• Safety goggles or glasses
• Safety gloves
• Small scale
• 2 large measuring cups
• Wooden spoon or hand mixer
• Pan
• Thermometer
• Knife
• Plastic container to use as a mold
• Wax paper

Note: Because lye fumes are hazardous, be sure to work with lye in a well-ventilated area.

INSTRUCTIONS FOR MAKING BARS OF SOAP:

1. Make a cup of coffee and put it into the refrigerator, making sure it cools thoroughly.
2. Pour the appropriate amount of cold coffee into a measuring cup.
3. Put on the safety goggles and safety gloves.
4. Put the measuring cup on the scale and set the scale to zero. This ensures that the scale is only measuring the amount of lye and not the weight of the measuring cup.
5. Pour the lye into the measuring cup until the scale reads the correct amount. Be extremely careful with the lye—do NOT breathe in the fumes!
6. Without letting anything splash, slowly pour the lye into the coffee in the other measuring cup. Absolutely do NOT pour the coffee into the lye!
7. The lye-coffee mixture will be hot, so set it aside temporarily to cool. Check the temperature occasionally with a thermometer, making sure it does not go below 100º F to 110º F.
8. Stir the soybean oil, coconut oil, and olive oil in a pan. Heat the pan on the stove until the oil mixture thermometer temperature reads 100º F to 110º F.
9. When the lye mixture and oil mixture reach the exact same temperature, stop heating the pan.
10. Slowly pour the lye mixture into the oil mixture.
11. Making sure not to let anything splash, stir the solution vigorously.
12. Keep stirring steadily and carefully until the mixture has the texture of honey. If you are using a wooden spoon, this part can take up to an hour. If you use the hand mixer, it can take a matter of minutes. However, be especially careful not to splash the mixture or speed up the process too quickly.
13. Pour the solution into the plastic container mold and put the lid on. Wrap the mold in a blanket or towel to insulate the soap in order to keep it warm. Leave it like this for 48 hours.
14. Unwrap the blanket or towel and take the lid off of the plastic mold. If the solution is still soft, leave the mold with top off for another day. If it has hardened, peel the soap away from the sides and turn the mold over onto wax paper.
15. Run the knife under hot water to heat it, and then dry it with a clean towel.
16. Cut the soap into bars.
17. Leave the soap bars out in the open for 3-4 weeks to let them cure. Although you can start using them after a day or so, curing them allows them to last longer and lather better.

MAKING SOAP BARS IN BULK: If you would like to make more soap bars at one time, you can scale up the recipe by increasing the amount of all of the ingredients while keeping the same ratio. The measuring cups should then be replaced with pitchers, and the pan should be replaced with a large boiling pot.

INSTRUCTIONS FOR MAKING LIQUID HAND SOAP: If you want to make some liquid hand soap out of the natural soap you just made, all you need is a bar of your homemade soap and some distilled water.

1. Grate, slice, or chop up a 3 oz piece of soap into pieces as small as you can. The smaller the pieces, the less time is needed to melt it down.
2. Boil 3 cups of distilled water. Keep some more water on hand. If the mixture is too thick, add water until you get the thickness you want.
3. If you want to make your soap smell more herbal, boil the water with some herbal tea bags to make essentially a large pot of tea. Be sure to take the tea bags out once you’ve made the tea.
4. After the water or tea has come to a boil, pour the pieces of soap into the pot. Mix the water with the soap.
5. Turn off the stove or let the mixture simmer in the pot for about 15 minutes.
6. The soap should now be partially blended into the water or tea. Using a cooking utensil or hand mixer, stir through any chunks of soap until it completely melts into the solution.
7. Let the solution set and cool overnight. If the solution is too thick, heat up the solution again and mix in some more water. Remember that the solution becomes thicker as it cools, so overcompensate a little.
8. Let the liquid soap cool again for 10 more minutes and stir it. If it’s still too thick, repeat step number 7. If it’s just right, it’s done! Just pour the liquid hand soap into a reusable soap pump and place it near the sink. When you wash your hands, you can go green and be clean!


Links to the original posts:

http://www.greeniacs.com/GreeniacsGuides/Homemade-Toothpaste.html

http://www.greeniacs.com/GreeniacsGuides/Natural-Deodorants.html

http://www.greeniacs.com/GreeniacsGuides/Homemade-Soap-Recipes.html

Worm Tubes

Here’s a neat link I found that talks about worm tubes for your garden. Worm tubes are wide pipes, partially buried throughout the garden, with holes cut in the buried ends. food scraps are dropped into the pipes to attract worms to enter to tubes, thereby leavings their precious wastes in your garden. The tops are covered loosely with a pot or cap to prevent flies, so the entire system in super easy, super simple, and lasts a lifetime!


Here’s the link: http://www.garden.org/regional/report/arch/inmygarden/3430

Spinning & Weaving in Portland, ME

The Portland Fiber Gallery & Weaving Studio is awesome! and it’s not too far away!

~It offers LOTS of classes based on fiber use: weaving, spinning, wet felting, needle felting, and dyeing. Here’s a sample:

Spinning Classes:

Drop Spindle Spinning

Tap into the past with this very portable and low-tech method of spinning fiber into yarn.  For most of history, cloth was spindle spun.  A wheel may produce yarn faster, but a spindle can be transported very easily and it is much less expensive!

March 12th & March 19th, 2:00-3:30pm.  Cost is $65 and includes a spindle and fiber.

LongGreenHouse event celebrates Life Art

One of the coldest weeks of the year didn’t stop attenders of Aurono Borealis, an outdoor performance at LongGreenHouse this January.  Intermedia MFA students in Joline Blais’s LifeArt class organized a “council of beings” that attracted a variety of faculty, students, and members of the Wabanaki community.
Continue reading

Worms Can Help Too!

Looking for a cheap, easy, and fast way to compost your everyday kitchen scraps? If so, vermicomposting is exactly what you’re looking for. Vermicomposting is composting your scraps with a little help from redworms (Eisenia foetida). Approximately one pound of red worms can easily take care of a half-pound of garbage a day. Because they can get rid of garbage so fast, many people are looking into vermicomposting as a way to decrease global warming. What an easy way to keep organic materials out of landfills!

Redworms are also known under various common names, including brandling worms, tiger worms and red wiggler worms. These worms are a species of earthworm adapted to decaying organic material, that is why they are favored for vermicomposting over all other worms.

Vermicomposting is extremely inexpensive. A pound of redworms is around 14 dollars and with scrap material around the yard, that is all you will have to invest in. Redworms prefer temperatures between 55 and 77 degrees Fahrenheit, with this said it is hard to keep them outside through the winter. An easy way to store these worms is in a plastic bin like that of which you store clothing in because it is light enough to transport. Below are 5 easy steps in making your own worm ranch.

1. Choose a bin that is large enough to store worms, bedding, and food.

2. Add water-soaked bedding. (Shredded newspaper, peat moss or leaf mold)

3. Add Redworms. (Redworms are the most satisfactory and efficient type.

4. Bury Garbage. (Steer clear of meats, bones, and fats. Cover food with bedding)

5. Harvest Compost. (An easy way to do this would be to place new food on opposite end of bin and wait a couple weeks, all the worms will migrate to the new food allowing you to harvest where they had just been)

*During the composting process it is advised to collect the drainage (compost tea) which is great to fertilize plants. If possible fix a spout onto the bottom of your bin and a mesh screen so liquid fertilizer can be easily drained from the bin.

*Keep in mind that the worms will be reproducing so you could even use this process to profit by selling the worms.

Garden Planning

As it gets further into fall and winter, it gets ever closer to spring, a very busy time for gardeners. To help the spring go as smoothly as possible in your yard, consider planning out next year’s garden beds over the winter! Here’s some tips!

1.  Go outside and observe your yard. Draw a map, and mark on it the important features, such as where the sun rises and sets, where buildings are located, where water collects into puddles after a large rain, etc. You will need to consider these aspects when planning. Using a soil guide(google it) and a ph test(buy one at a pet store or feed store), determine what kind of soil you have, and then research how to improve it. There are a lot of guides on the internet about how to help your soil. Prepare your beds with some sheet mulching and minerals, as your soil demands.

2. Figure out what you want to plant! Here in the Bangor area, we are in plant hardiness ‘zone 5’. Consider what you and your family like to eat, will use up, have the soil for, and have the time for. Remember that it is better to start small and grow a few great plants than to take on too much, and end up with a hundred wimpy plants. Here are a few good guides to edibles:

http://www.luvnpeas.org/edibility/edible.html#plantIndex

http://www.thegardenhelper.com/vegtips.html

3. Once you have determined what you’re going to grow, get your seeds! Ask your local feed store (like Agway) about local seed savers, who will know the most about your area’s most suitable varieties. You can also order them online, but be sure that they are appropriate for your area, that the seller is reputable, and that they are made to be grown organically. Some seed sellers only sell “Round-up Ready” seeds, which are genetically modified to be tolerant of pesticides. These are NOT healthy seeds for you! Nor are they healthy for your yard, soils, water, pets, children, and wildlife! Also beware of hybrid seeds, as they are more susceptible to disease, and also (usually) require pesticides to thrive. Here is a great online guide of organic and heirloom varieties(note that there are links on the side to Herbs, Vegetables, Potatoes, etc.):

http://www.seedsavers.org/Content.aspx?src=buyonline.htm

4. Sit down with your vegetable list, yard map, and a companion planting guide. What some plants take out of the soils, other plants put in, so you’ll want to help your plants help each other by putting them into symbiotic relationships. A good guide to this is:

http://www.ghorganics.com/page2.html

-Consider interplanting; Plants that are in a beneficially diverse bed are less likely to succumb to pests and blight. To a potato bug, a bed of only potatoes is a feast; replace some of those potatoes with radishes, and they won’t touch it. Also consider the size, soil requirements, water and sun requirements, and planting/harvesting times of each plant, as these are important to planning.

5. Once your beds are prepared, your seeds are ordered, and your plans are drawn up(and well researched), you are ready for the spring! Don’t forget to start your seeds a few weeks before the frost, if recommended. Now relax; I recommend an open fire and a good book.

Edible Forest Gardening in Orono, ME

One of the primary goals of the Stillwater Permaculture Guild is to develop an edible forest research garden. Through landscape and community design that prioritizes local and beneficial plants working in concert with one another and the landscape (a system called guilding), we have been researching what a highly productive permaculture system is capable of in a medium/high density residential area. All parts of the project are designed to be repeatable in various scales and priorities, as diverse as college campuses, Maine’s cities and agricultural lands.

Three years ago a multidisciplinary team started with close observation and  interaction with the land, a year later a basic landscape design, and eventually systemic actions that stimulate a ecological integrity, and capacity for food production without taking resources away from the land. The past 6 months has seen the largest changes to the landscape since the project began including, extensive soil building, planting, cover cropping, and pruning. Additionally a system that passively filters rainwater and groundwater through the land is under development.

The project is the result of the community’s strong affinity for permaculture design and its ability to help communities redirect food, fuel, and fiber responsibility and production to the immediate local community. We believe that when such a system is in effect there is a direct and sustained benefit to the local economy as well as in the ecology. The project, although long-term in scope, will soon be releasing it’s first major reports.

Southwest Section of Stillwater Permaculture Guild Edible Forest Research Gardens

Twenty Healthiest foods under $1 per serving

The Twenty Healthiest Foods for Under $1

Food prices are climbing, and some might be looking to fast foods and packaged foods for their cheap bites. But low cost doesn’t have to mean low quality. In fact, some of the most inexpensive things you can buy are the best things for you. At the grocery store, getting the most nutrition for the least amount of money means hanging out on the peripheries—near the fruits and veggies, the meat and dairy, and the bulk grains—while avoiding the expensive packaged interior. By doing so, not only will your kitchen be stocked with excellent foods, your wallet won’t be empty.

1. Oats
High in fiber and complex carbohydrates, oats have also been shown to lower cholesterol. And they sure are cheap—a dollar will buy you more than a week’s worth of hearty breakfasts.

Serving suggestions: Sprinkle with nuts and fruit in the morning, make oatmeal cookies for dessert.

2. Eggs
You can get about a half dozen of eggs for a dollar, making them one of the cheapest and most versatile sources of protein. They are also a good source of the antioxidants lutein and zeaxanthin, which may ward off age-related eye problems.

Serving suggestions: Huevos rancheros for breakfast, egg salad sandwiches for lunch, and frittatas for dinner.

3. Kale
This dark, leafy green is loaded with vitamin C, carotenoids, and calcium. Like most greens, it is usually a dollar a bunch.

Serving suggestions: Chop up some kale and add to your favorite stir-fry; try German-style kale or traditional Irish Colcannon.

4. Potatoes
Because we often see potatoes at their unhealthiest—as fries or chips—we don’t think of them as nutritious, but they definitely are. Eaten with the skin on, potatoes contain almost half a day’s worth of Vitamin C, and are a good source of potassium. If you opt for sweet potatoes or yams, you’ll also get a good wallop of beta carotene. Plus, they’re dirt cheap and have almost endless culinary possibilities.

Serving suggestions: In the a.m., try breakfast homefries; for lunch, make potato salad; for dinner, have them with sour cream and chives.

5. Apples
I’m fond of apples because they’re inexpensive, easy to find, come in portion-controlled packaging, and taste good. They are a good source of pectin—a fiber that may help reduce cholesterol—and they have the antioxidant Vitamin C, which keeps your blood vessels healthy.

Serving suggestions: Plain; as applesauce; or in baked goods like breads. Applesauce is also a great substitute for butter in dessert recipes.

6. Nuts
Though nuts have a high fat content, they’re packed with the good-for-you fats—unsaturated and monounsaturated. They’re also good sources of essential fatty acids, Vitamin E, and protein. And because they’re so nutrient-dense, you only need to eat a little to get the nutritional benefits. Although some nuts, like pecans and macadamias, can be costly, peanuts, walnuts, and almonds, especially when bought in the shell, are low in cost.

Serving suggestions: Raw; roasted and salted; sprinkled in salads.

7. Bananas
At a local Trader Joe’s, I found bananas for about 19¢ apiece; a dollar gets you a banana a day for the workweek. High in potassium and fiber (9 grams for one), bananas are a no-brainer when it comes to eating your five a day quotient of fruits and veggies.

Serving suggestions: In smoothies, by themselves, in cereal and yogurt.

8. Garbanzo Beans
With beans, you’re getting your money’s worth and then some. Not only are they a great source of protein and fiber, but ’bonzos are also high in fiber, iron, folate, and manganese, and may help reduce cholesterol levels. And if you don’t like one type, try another—black, lima, lentils … the varieties are endless. Though they require soaking and cooking, the most inexpensive way to purchase these beans is in dried form; a precooked can will still only run you around a buck.

Serving suggestions: In salads, curries, and Hummus.

9. Broccoli
Broccoli contains tons of nice nutrients—calcium, vitamins A and C, potassium, folate, and fiber. As if that isn’t enough, broccoli is also packed with phytonutrients, compounds that may help prevent heart disease, diabetes, and certain cancers. Plus, it’s low in calories and cost.

Serving suggestions: Throw it in salads, stir fries, or by itself.


10. Watermelon
Though you may not be able to buy an entire watermelon for a dollar, your per serving cost isn’t more than a few dimes. This summertime fruit is over 90 percent water, making it an easy way to hydrate, and gives a healthy does of Vitamin C, potassium, and lycopene, an antioxidant that may ward off cancer.

Serving suggestions: Freeze chunks for popsicles; eat straight from the rind; squeeze to make watermelon margaritas (may negate the hydrating effect!).

11. Wild Rice
It won’t cost you much more than white rice, but wild rice is much better for you. Low in fat and high in protein and fiber, this gluten-free rice is a great source of complex carbohydrates. It packs a powerful potassium punch and is loaded with B vitamins. Plus, it has a nutty, robust flavor.

Serving suggestions: Mix with nuts and veggies for a cold rice salad; blend with brown rice for a side dish.

12. Beets
Beets are my kind of vegetable—their natural sugars make them sweet to the palate while their rich flavor and color make them nutritious for the body. They’re powerhouses of folate, iron, and antioxidants.

Serving suggestions: Shred into salads, slice with goat cheese. If you buy your beets with the greens on, you can braise them in olive oil like you would other greens.

13. Butternut Squash
This beautiful gourd swings both ways: sometimes savory, sometimes sweet. However you prepare the butternut, it will not only add color and texture, but also five grams of fiber per half cup and chunks and chunks of Vitamin A and C. When in season, butternut squash and related gourds are usually less than a dollar a pound.

Serving suggestions: Try squash bread(like pumpkin bread)!

14. Whole Grain Pasta
In the days of Atkins, pasta was wrongly convicted, for there is nothing harmful about a complex carbohydrate source that is high in protein and B vitamins. Plus, it’s one of the cheapest staples you can buy.

Serving suggestions: Mix clams and white wine with linguine; top orzo with tomatoes and garlic.

15. Sardines
As a kid, I used to hate it when my dad would order sardines on our communal pizzas, but since then I’ve acquired a taste for them. Because not everyone has, you can still get a can of sardines for relatively cheap. And the little fish come with big benefits: calcium, iron, magnesium, zinc, and B vitamins. And, because they’re low on the food chain, they don’t accumulate mercury.

Serving suggestions: Mash them with parsley, lemon juice, and olive oil for a spread; eat them plain on crackers; enjoy as a pizza topping (adults only).

16. Spinach
Spinach is perhaps one of the best green leafies out there—it has lots of Vitamin C, iron, and trace minerals. Plus, you can usually find it year round for less than a dollar.

Serving suggestions: Sautéed with eggs, as a salad, or add to pasta dishes, like lasagna.

17. Tofu
Not just for vegetarians anymore, tofu is an inexpensive protein source that can be used in both savory and sweet recipes. It’s high in B vitamins and iron, but low in fat and sodium, making it a healthful addition to many dishes.

Serving suggestions: Use silken varieties in tofu cheesecake; add to smoothies for a protein boost; cube and marinate for barbecue kebobs.

18. Lowfat Milk
Yes, the price of a gallon of milk is rising, but per serving, it’s still under a dollar; single serving milk products, like yogurt, are usually less than a dollar, too. Plus, you’ll get a lot of benefit for a small investment. Milk is rich in protein, vitamins A and D, potassium, and niacin, and is one of the easiest ways to get bone-strengthening calcium.

Serving suggestions: In smoothies, hot chocolate, or coffee; milk products like low fat cottage cheese and yogurt.

19. Pumpkin Seeds
When it’s time to carve your pumpkin this October, don’t shovel those seeds into the trash—they’re a goldmine of magnesium, protein, and trace minerals. Plus, they come free with the purchase of a pumpkin.

Serving suggestions: Salt, roast, and eat plain; toss in salads.

20. Coffee
The old cup-o-joe has been thrown on the stands for many a corporeal crime—heart disease, cancer, osteoporosis—but exonerated on all counts. In fact, coffee, which is derived from a bean, contains beneficial antioxidants that protect against free radicals and may actually help thwart heart disease and cancer. While it’s not going to fill you up like the other items on this list, it might make you a lot perkier. When made at home, coffee runs less than 50¢ cents a cup.

Serving suggestions
: Just drink it.


source: http://www.divinecaroline.com/22177/52070-twenty-healthiest-foods-1/print

Weather Forecasting(without gadgets)

The weather is a very important part of a gardener’s life. Unfortunately, a lot of people have difficulty determining what the day will bring without the use of gadgets. I stumbled upon this guide, and I think it is really helpful to people working outside in the elements:

<a href=”http://www.marisys.com/how-to-forecast-weather_2010-05-26/”><img src=”http://www.marisys.com/wp-content/uploads/2010/05/How_to_forecast_weather.jpg&#8221; alt=”How_to_forecast_weather”/></a>


source: http://www.marisys.com/how-to-forecast-weather_2010-05-26/

Straw in the Landscape

We are fortunate enough to have some local farmers growing organic barley straw nearby. So valued in no till gardening, and so hard to find. This batch came from a field in Benedicta, ME in the shadow of Mt. Katadin.

Aroostook County Barley Straw up for storage at SWPG

Cabbage and calendula harvested today!

66 Edibles to Grow in Containers!

Citrus Trees Indoors!As Mainers, we have a short outdoor growing season. Therefore, we need to expand the number of alternative growing methods. I found this article on edibles that can be grown indoors in containers, which enables us to feed ourselves hyper-locally through the winter! See below for tree fruits, citrus fruits, melons, herbs, leafy greens and more!

(To find edible seedlings, try your local farmers’ market, or http://logees.com/products.asp?dept=166 ) Continue reading

Pigs and Dirt

Saturday, I enjoyed the lovely Maine foliage in my own yard while I prepared to turn my compost pile for the first time since its installment in March as a birthday gift. It is simple, three tires, stacked, sidewalls cut out with a saws all.(to make this kind of compost heap yourself, visit: http://www.doityourself.com/stry/making-a-compost-bin-out-of-old-tires)

My company is a potbelly piglet, Hamlet, Continue reading

Sheet Mulching

The primary methods for making garden beds at SWPG demonstration site is sheet mulch. This method layers a number of different ingredients that tap the great resources of the waste stream and the work of various farms and farm animals.

Sheet Mulching for no-til gardens

Fruit Tree Polyculture

Apples and gourds onsite at the Stillwater Permaculture Gardens

This years polyculture experiment included an unplanned partnership between the apple and the dipper gourds.

The gourds were started from seed in April and tranplanted outside in the summer. This particular gourd bee-lined it straight to the apple tree Continue reading

Still Water Permaculture Guild launches green living at UMaine

Sheet Mulching Workshop

This fall, four UMaine students will practice sustainable living as part of their education  in a permaculture homestead at the south edge of campus .Inheriting a greenhouse, cold frame, swaled garden beds, perennial gardens and the planting of food forest trees along a corridor into campus from former student projects onsite, these students will model green living as an education option.

As “journeyparsons– modeled on MOFGA’s self-directed apprenticeship program–these student will combine coursework, onsite projects and hands-on permaculture training as well as consensual governance in their homestead as a means to put permaculture skills into practice and ground their education in the rich soils of Orono.

The SWPG is inviting interested faculty and community members to join the project as advisors/fellows in a skill-sharing format. We are currently seeking 1-2 work-study students as well. For more information contact us.

UMaine Permaculture Club Partnering with LongGreenHouse

This fall students of permaculture in the Penobscot Valley and at UMaine have partnered with the LongGreenHouse home site in Orono. The partnership provides the opportunity to implement design strategies and practice growing and propagating perrenial fruits, nuts, berries, and vegetables. The opportunity is unique because it gives students and community members an opportunity to subsist and make a living by an immersive engagement with a typical suburban homesite. Something not otherwise practical unless one owns land of their own.

The project is open to research proposals, growing initatives, and small garden proposals from students and community members.

Making sheet mulched garden beds for an edible foundation planting

The front yard of LongGreenHouse being turned into a small forest garden.

Green U-ME, May 1st 1-4PM

lgh_announce

The Permaculture Club is has joined forces with LongGreenHouse and Still Water to bring you “Green U-ME”. Please visit CHARETTE DOCUMENTS to preview  environmental assessment info for the day’s events.

The “Green U-ME” event follows in the footsteps of the York Ecovillage project which was started on Earth Day in 2008 and is now on it’s way to approval in the University community. The event is organized by LongGreen House and Permaculture UMaine, with sponsorship by Stillwater. Green U-ME will take place in the Bangor Room (1-4pm) of the Memorial Union and is free and open to the public.

Gallery

Permaculture Symposium

This gallery contains 3 photos.

December 4th marked the first ever Permaculture Symposium at UMaine. The event brought together an interdisciplinary from across Maine and New England to present researched techniques for ecological design. Presenter came from as far as the University of Vermont, but … Continue reading

Deep Craft at ConFlux

CONFLUX SYMPOSIUM

Waterfall Arts held their annual symposium ConFlux Nov. 14 – 15 in Belfast.

The Permaculture UMaine and The Intermedia MFA program sponsored the participation of UMaine students. The event’s keynote address came from Scott and Ene Constable, founders of Wowhaus (www.thewowhaus.com) presented their concept of “Deep Craft” as a creative practice.  With roots in construction and architechture, they are developing a process of interaction between social and ecological realities, with the aim of strengthening each. In this process the community often becomes the stewards of collaborative work. Following the address they facilitated a workshop whee participant were asked to silently create a collaborative sculpture using wood recovered from the transfer station. Four sculptures were erected and symbolically set aflame to conclude the event.

Wowhaus has collaborated with projects such as the Edible Schoolyard (www.edibleschoolyard.org), and have designed and implemented Deep Craft projects as across the country and in their home in Northern California.

For more info on Waterfalls Arts click herewww.waterfallarts.org